This post contains affiliate links. Please see our disclosure policy.

This past Sunday was my youngest daughter’s birthday and she requested bagels and salmon for her birthday breakfast treat. Good choice! Since I have already shared my seasonal spiced pumpkin bagel recipe, it’s time to share the plain version. Don’t let the moniker fool you; these are anything but plain in taste and texture.
If you are a regular reader, you may know that I enjoy baking my own bread, like white bread, pita, and country bread. There are several reasons why I put in the time and effort required. One taste and it is hard to go back to the store-bought. Besides the obvious better taste and texture, homemade bread has far fewer ingredients and I can pronounce them all:)
Many people are intimidated by making bread (or in this case, bagels) from scratch, but really all it takes is a little practice and getting to know the unbaked feel and look of the dough.
Unlike some bagel recipes that require a sponge, a “float test”, and overnight refrigeration (I can see why such a recipe would be intimidating), this one is hands down easy peasy for homemade bagels in under 2 hours, really. I have included a few step-by-steps to help you along visually.
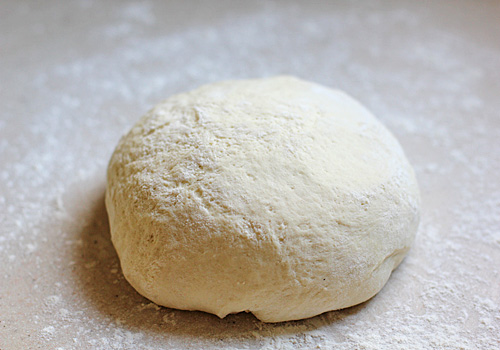
Once the dough has been kneaded and allowed to rise, turn it out onto a lightly floured work surface. Gently de-gas the dough and allow to rest for 10 minutes.
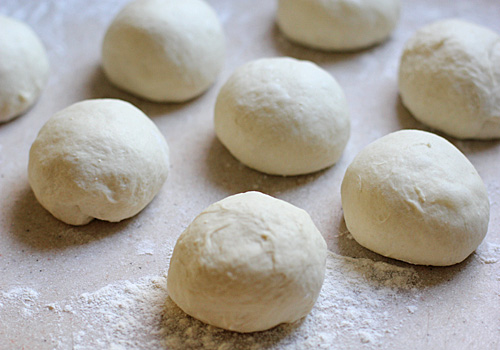
Divide the dough equally into 8 pieces (about 3 1/4-ounces each). Roll each piece into a ball.
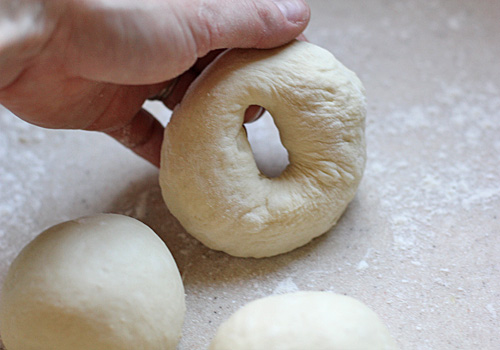
Using a floured finger, poke a hole through each ball and gently stretch the opening about 1/3 of the bagel’s diameter.

Place the shaped bagels on a baking sheet lined with parchment paper, or in this case, a silpat; cover and let them rise for another 10 minutes.

Poach the bagels in a large pot of water for 1 minute on each side.

Remove the bagels from the water; drain and return to the baking sheet. Optional toppings, like poppy seeds and sesame seeds are added at this time. Bake in a 425ºF oven for 20-25 minutes or until golden brown.

We enjoy them plain, with poppy seeds or sesame seeds, and some with both. They have a perfect light texture and a good pull. The only hard part about these bagels is trying to decide what you are going to top or sandwich them with. Will it be cream cheese, butter-n-jam, peanut butter, Nutella (oh yeah), cheese, eggs, salmon…?!
“As an Amazon Associate, I earn a commission from qualifying purchases that you make from the links within my posts and recipe cards with no added cost to you.”
Homemade Bagels

Ingredients
- 2 ¼ teaspoons dry active yeast
- 2 teaspoons granulated sugar
- 1 ⅓ cups warm water
- 3 ½ cups bread flour, plus extra for kneading
- 1 ¾ teaspoons kosher salt
- Poppy seeds, optional
- Sesame seeds, optional
Instructions
- In the bowl of a stand mixer, add the flour, sugar, yeast and salt. With the mixer on low, slowly add the water. Continue to mix until the dough comes together in a mass, about 4-6 minutes. Increase speed to medium-high and knead for another 8-10 minutes until soft and smooth. Put the dough in a bowl sprayed lightly with non-stick baking spray. Cover with a towel or lightly oiled plastic wrap and let rise for 1 hour or until doubled in size.
- Gently de-gas the dough and let the dough rest for 10 minutes.
- Meanwhile, preheat the oven to 425ºF and bring a large pot of water to a boil; then reduce to a simmer.
- Divide the dough into 8 pieces. Press each piece down to get rid of air bubbles. Form into balls and roll the balls between your palm and the work surface, rotating to form a smooth ball. Coat a finger in flour and press it through each ball to form a ring.Twirl the ring around the index of one hand and the thumb of the other, stretching the dough and widening the hole to about ⅓ of the bagel’s diameter. Place the bagels on a baking sheet lined with parchment paper or a silpat and cover with a towel. Let rest for another 10 minutes.
- Gently lower the bagels into the water in batches, 2-3 bagels at a time. Boil uncovered for about 1 minute. Turn them over once and boil for another minute. Using a perforated skimmer, remove the bagels from the pot, letting the water drain; return to the baking sheet. (Optional- sprinkle the top of the bagel with poppy seeds, sesame seeds, or both). Bake for 20-25 minutes or until golden. Transfer to a wire rack to cool completely. Enjoy!
Nutrition
Nutrition information is automatically calculated, so should only be used as an approximation.
Wow, these bagels look better than any other bagels I've seen in stores. And they sound so simple and easy to make! Great recipe, can't wait to try these out!
Jess-
Thank you! I hope you enjoy them as much as we do:)
These bagels look delicious! I tried making bagels once but they turned out really lumpy…maybe I'll have to give it another try with this recipe! Gorgeous! 🙂
How do you "de-gas" dough? Just press down on it all over with your hand? Never seen this done before. Also, what's the best way to divide a ball of dough into 8 pieces? Roll it out into a sausage and cut up? I really want to try these as they look sooo good. Thanks!
L.E. Raymond-
Unlike some bread dough where you want to handle the dough as little as possible to retain the airy bubbles, this one is a little more forgiving. When you turn the risen dough out onto the work surface, gently press it with your hand to release some of the air bubbles (there still will be a few more since this is a yeasty dough) and then shape it into a ball. Once it has rested again, I cut the dough with a sharp knife into 8 "pie" pieces and then shape each piece into a ball. You can certainly roll it into a sausage and cut it that way too. I hope you give this a try!
Have never thought about making bagels at home, but I love how simple you've made this (nb, your daughter has excellent taste, I think smoked salmon bagels would have to be one of my favourite things too)
wow those look amazing. i think i'm actually going to try them. we love bagels and can't find those either here in spain! so i guess i'll be making some!! thanks for the great tutorial 🙂
After avoiding making bagels for 3 years because they seemed too finicky, I just made these today on a total whim. And they turned out great! Thanks so much for nudging me to face my fear of boiling dough and give bagel-making a shot.
Anne-
I am so glad you faced your fear with a great end result. Thank you for letting me know!
I made bagels once and they did not turn out nearly this well! I will have to try again with your recipe – they look so good 🙂
I've never made bagels in my life! I just followed your recipe and it turned out perfect. Thanks for sharing!
Do these bagels freeze well?
Cris- I am so pleased you made them and enjoyed them! Thank you for letting me know. As far as freezing them, I cannot speak from experience, but I would wrap each one individually in plastic wrap and place them in an airtight freezer bag. Thaw them completely in the plastic wrap before using and they should turn out fine.
I just made these bagels! The holes on my bagels ended up swollen shut and the bagels were pretty puffy (almost like a big dinner roll), but they were GOOD!
I let the dough rise overnight in the fridge (which may have contributed to the puffiness). I'd use this recipe again and next time I'd like to try a sweet bagel like cinnamon raisin.
Keeley-
I am glad you enjoyed the recipe:) It is a nice bagel base that can be adapted to other flavors and additions.
I must have done something wrong. my dough almost tripled in size (it was overflowing the bowl i ALWAYS make bread in), and then it was sooooo sticky i couldnt shape it. then they fell apart when taking them out of the water bath.
they are in the oven now, and i will still eat them but i have never had such an issue with dough. it is pouring out right now, so i bet that has something to do with the issues. cant wait to try this again one afternoon when i can tamper with the recipe 🙂
Michellery-
I have never had problems with this recipe, so I can't pin point what went wrong. When kneading the dough it should barely stick to the bottom of the bowl. That is when you know if you have enough moisture. If your dough is rising in a extra warm and moist environment, it might not need the entire rising time. One thing about baking bread, you have to customize it to your temperature and moisture surroundings. I do hope you keep at it because it is a wonderful recipe.
I used whole wheat flour instead of bread flour and they worked out really well. They were absolutely delicious fresh out of the oven– my boyfriend ate two! Thank you so much for the recipe.
Bellster-
You are welcome! Glad you and your boyfriend enjoyed them with whole wheat. Thanks for letting me know.
Never made bagels and have been cautious about making breads with my limited kitchen but these are amazing. Your step by step instructions were extremely helpful and I got tons of compliments. Much appreciation
Jordan
Jordon-
You are very welcome:) Thank you for letting me know how much you enjoyed the recipe!
Since I've tried your recipe, we can't stop eating those! It turned out really great! Your recipe is simple to follow, and the result is amazing. Thank you so much to share all those tips and ideas…
Charlotte-
You are welcome. I am so glad you enjoy the recipe!
I used all purpose flour, they turned out flat when I boiled them. Is it because of the type of flour?
Kookkaii-
Bread flour is a high-gluten flour that retains more gas once it has risen and baked. Using all-purpose flour results in a bagel that has lost its loftiness and chewiness.
I live in the Middle East, and for the past several months the local supermarkets have been out of bagels. Thankfully, I came across your website and made your bagel recipe. Your directions & pictures, which I absolutely loved, looked easy enough for me to handle this task.
Wow! All I can say is I will never ever purchase another bagel; even when I return back to the states!! This recipe is absolutely delicious and easy to make. Thank you so much for creating this fabulous blog. This past weekend I’ve tried several of your recipes and can’t wait to try more.
My husband & I still have smile on our faces when we think of your bagels. Keep on cookin…
Thank you for such a kind comment. It put a smile on my face:) I am glad you enjoy the bagel recipe and I hope you enjoy the other recipes you try. Happy cooking!
I love this recipe as it is so simple, but my bagels never look as gorgeous as yours! Your bagels look like something you'd see at Panera or a nice deli. Mine always look kind of sad and lumpy with no sheen. I'm using AP flour. Could that be the issue? Is there anything else you can suggest? The taste is still there; just not the beauty. 🙁
I am glad you like the simplicity of the recipe. In regards to your sad and lumpy looking ones,it is most likely due to the type of flour you are using. Bread flour is a high-gluten flour that retains more gas once it has risen and baked. Using all-purpose flour results in a bagel that has lost its loftiness and chewiness.
Thank you so much for this recipe. I have been searching for a simple recipe for a beginner baker and I tried yours out this past weekend. I couldn't have hoped for a better turn-out. I ended up kneading by hand for the second step (my mixer's bread hooks weren't working out). Although they weren't as good looking as I hoped for, I can't complain about the density and taste. Thanks again!
Could these be refrigerated over-night sans toppings? I'd like to have fresh baked bagels in the morning, but I'm not willing to sacrifice my precious beauty sleep! 🙂
I can't say from experience how they will turn out, but once shaped, I would place them in the refrigerator, covered, to rise overnight. The next morning, boil, top, and bake for fresh bagels.
This recipe makes the best bagels ever! I even had to make them with just one hand since my other arm is in a sling. They weren't as beautiful as yours, but the flavor and texture were better than any bagel I have ever eaten. Dad agrees! They freeze beautifully, too. I just wrapped each one in plastic wrap, then in aluminum foil. For convenience, I then placed all of them in a bread bag and popped them into the freezer. They thaw beautifully and retain their flavor and texture. We will never eat another store bought bagel. Dad and I thank you!
Glad to hear they freeze well. Mine never make it that far ☺.
Holy shit! these were amazing! I poached them in honey and added a layer of chopped pecans on the bottom and top before baking i drizzled them in honey and I they were so gooood thank you for the recipe I will forever be faithful! 🙂
Making them now and I'm so excited!!! Do you ever egg wash then after boiling and before baking? Thanks!
No I don't. Hope you enjoy them.
I am about to make these this afternoon and I am excited to have found a recipe that looks simple and delicious! Your bagels are beautiful – I hope mine don't turn out looking like boulders!
can I use self riseing flour instead of bread flower?
I would not recommend it. Self rising flour has baking powder in it for leavening. Yeast is required for the leavening in this recipe.
Just made these. They are in the oven and in 20 minutes I can't wait to try them! I made Garlic/Poppy, Poppy, cheese, and plain… Ahh!! My mouth is watering!
I hope you enjoyed them!
These just came out of the oven and they look fantastic! My house smells even better! I haven't eaten one one yet but I still see myself using this recipe over and over! Btw for anyone that typically buys all-purpose flour instead of bread flour, invest in Vital Wheat Gluten! Use about 1 tablespoon per cup of flour and bam you have bread flour! 🙂 Thank you for the recipe!
Hello! I love your recipe, I've made it many times and we just eat them all in seconds. I wanted to ask you, do you think I can make the dough overnight and just form and bake them in the morning? if so, do you think it is better to make the bagels at night or just before i start cooking them?
Thank you
I can't say for certain. But If you do try it the night before, make the dough, cover, and place it in the refrigerator for a slow first rise. In the morning, set the dough on the counter and allow to come to room temperature before proceeding with the recipe.
Thank you very much for answering! I will try and see what happens!!
Whole wheat flour IS bread flour.
You overprooofed or didn't use bread flour.
Best recipe for bagels EVER!! Thank you 🙂
Thank you for sharing the recipe. This is my son's favourite. We normally eat at Circle Café here in Dubai but I'll try my hand at making bagels and – fingers crossed – be able to replicate Circle Café's bagels one day!
Does it have to be kosher salt? I am out and only have regular salt.
Made these bagels this afternoon and absolutely am hooked. Thanks so much for sharing. The recipe was simple to make because your instructions were so easy to follow and well detailed. I will never buy another bagel again!
xoxo,
strawberrymint,org
I made this recepies and get so crispy outside is corect?
These bagels are super easy, super quick, "yummy" and "better than Tim Hortons' version", to quote my 4 y/o daughter and her dad. I know a little about baking bread (for breakfast) but my bagels have never turned out this lovely because of all the complicated methods you mentioned above. I've made it three times already to be very sure, and it's my favourite recipe now, thanks to you, Madam.
Could you add chocolate chips, blueberries, or cinnamon and sugar?
Here is my recipe for Blueberry Bagels– https://www.thegalleygourmet.net/2012/04/blueberry-bagels.html
and French Toast Bagels–
https://www.thegalleygourmet.net/2012/01/french-toast-bagels.html
I made these bagels Saturday night and absolutely loved them!! First time making bagels and this wasn't too difficult at all! It's Monday and we have one left. I want to double the recipe, I wasn't sure how they would come out?do I literally double everything and continue as normal? I want sure about the yeast. Thank you for the recipe!
I love bagel and living in middle east makes it hard to find. Ur recipe seems nice. But I don't have bread flour can use a simple flour instead.
You can use all purpose flour and add vital wheat gluten, about 1 teaspoon per cup of flour.
Thank you so much for sharing this awesome recipe! I made a batch last night and they are the best tasting bagel we have ever eaten! I put chocolate chips in 4 of them and they are so yummy! This recipe is a keeper and so easy!
I just made a batch and only had all purpose flour. COVID=shortage of everything, including apparently bread flour 🙄 They turned out beautifully though!
I first made bagels last year and although they tasted good, they weren't the real thing. I sent some to my son in NYC and he even said they weren't the right texture – too "bread-y". To get the right chew, I read that you should add malt syrup to the water when boiling them. Well, I stumbled onto YOUR recipe, made a batch and they're absolutely perfect! Wonderful flavor AND perfect chewiness without any malt syrup! They are just the right size, also. I had to look back in my browsing history to find you again, thankfully here you are! Fabulous recipe, thank you so much! Can't wait until my son tastes them!
Kelly- Thank you so much for your comment and feedback! It really warms my heart! I am so glad you enjoy the bagel recipe as much as we do. Please check out my other bagel recipes😋🥯.